Thursday, June 1, 2017

Chicken Broccoli Alfredo

This recipe is adapted  from the following website
http://juliasalbum.com/2015/09/chicken-broccoli-alfredo-recipe/


Ingredients
·         1 bag frozen broccoli florets
   1 lb fettuccine noodles or  8 oz of penne pasta
·         1 tablespoon canola oil
·         1-2 chicken breasts, depending on their size and how much chicken you like
·         4 garlic cloves, minced

Sauce
 (Taken from Chef in Training)
  • ½ cup butter
  • 2 garlic cloves, minced
  • 2 cups heavy cream
  • ¼ teaspoon white pepper
  • ¼ teaspoon salt
  • 1½ cups freshly grated Parmesan cheese (not the grated stuff from a jar/plastic container due to the celluose added to prevent clumping)
*I buy a block of parmesan cheese and grate it right before I used it

Instructions
1.      Put broccoli in a microwaveable dish.  Add 2 tablespoons of water, cover with a lid and cook for 5 minutes.  After it's done cooking, keep it covered and set to the side
2.      Cook pasta al dente, (about 10 minutes) drain.  (While I was cooking the chicken and the sauce I would occasionally run the noodles under hot water to keep them from drying out and sticking together)
3.      In a large skillet heat olive oil and butter on medium-high heat (until hot but not smoking) and saute chicken breast (seasoned generously with salt and pepper on both sides) until the internal temperature is 160 degrees.  Remove the skillet from heat, cover with the lid, and let the chicken rest. Once the sauce has is ready  cut the chicken into either strips or chunks. 
4.      Add minced garlic to the same skillet and cook it in chicken juices and oil remaining in the pan, scraping up the chicken bits from the bottom of the pan, on medium heat for about 30 seconds until garlic is fragrant, making sure to avoid burning. Drain any liquid from the broccoli  and mix in with garlic. Cook for about 1 minutes. Remove from the pan.

To make the sauce:
  1. In a  clean medium sauce pan over medium heat melt butter. Add garlic, cream, pepper, and salt.
  2. Bring to a low boil and reduce heat to medium low and simmer for 8 minutes, stirring constantly.
  3. Remove from heat and slowly add cheese.
  4. Return to stove on low and cook for 2 to 3 minutes, stirring constantly.
     Add cooked pasta to the creamy sauce, then add broccoli. Taste and season with salt and pepper. Top with sliced, cooked chicken.


Monday, March 20, 2017

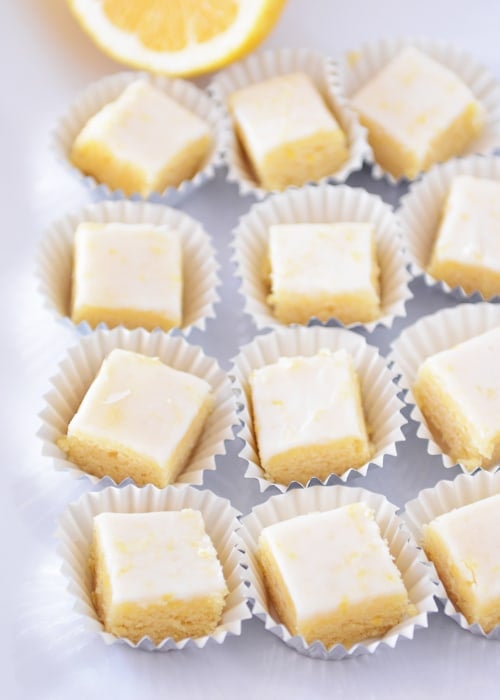
Lemonies from Mel's Kitchen Cafe

Lemony Lemon Brownie Bites


These taste just like lemon bars, but are way easier to make!


INGREDIENTS
    Lemon Batter:
  • 1 cup (5 ounces/142 grams) all-purpose flour
  • 3/4 cup (5.5 ounces/155 grams) sugar
  • 1/4 teaspoon salt
  • 1/4 teaspoon baking powder
  • 1 tablespoon lemon zest (from 1 large lemon)
  • 1 stick (8 tablespoons) butter, melted and cooled
  • 2 large eggs
  • 1 large egg yolk
  • 3 tablespoons fresh lemon juice
  • 1 teaspoon vanilla extract
  • Lemon Glaze:
  • 3/4 cup (2.75 ounces/75 grams) powdered sugar
  • 1 tablespoon fresh lemon juice
  • 1/2 teaspoon lemon zest
DIRECTIONS
  1. Preheat the oven to 350 degrees F. Line an 8X8-inch aluminum baking pan with parchment so that it hangs over two of the edges (to lift out the bars later - alternately, you can just grease the pan really well and slice them in the pan) and lightly coat the pan and parchment with nonstick cooking spray.
  2. In a large bowl, whisk together the flour, sugar, salt, baking powder and lemon zest.
  3. In a separate bowl or in a large liquid measuring cup, whisk together the butter, eggs and egg yolk, lemon juice and vanilla.
  4. Stir the wet ingredients into the flour mixture and mix until combined.
  5. Spread the batter evenly in the prepared pan.
  6. Bake for 18-20 minutes until a toothpick inserted in the center comes out clean or with moist crumbs (the top of the bars should spring back lightly when gently pressed). Don't over bake or they might be dry.
  7. For the glaze, whisk together the powdered sugar, lemon juice and lemon zest until smooth and combined.
  8. After the bars have cooled completely in the pan, drizzle the glaze over the top (since the glaze layer is thin, it helps to pour it all across the bars instead of in one puddle before spreading) and use an offset spatula or knife to spread evenly over the bars.
  9. Place the bars in the refrigerator for 1-2 hours to let the glaze set before lifting them from the pan (using the parchment overhang) and cutting into small squares. These taste best chilled, in my opinion, but can be served at room temperature also.

Recipe Source: adapted from Bakerella (cut down the butter, added weight measurements, used an extra egg yolk for super moistness, cut the glaze in half, etc)


Thursday, December 15, 2016

Chocolate Covered Cinnamon Bear Popcorn from Our Best Bites


Ingredients
1.    16 cups popped popcorn (about 2 bags microwave popcorn)
2.    1 cup butter
3.    1/3 cup Karo syrup
4.    2 cups Red Hot candies
5.    1/2 teaspoon cinnamon oil (more or less to taste)
6.    1 cup chocolate chips
7.    1 tablespoon shortening
Instructions
1.    Place the popcorn in a very large, heat-safe bowl and set aside.
2.    Preheat oven to 275 degrees F. Line 2 baking sheets with aluminum foil and grease or spray with non-stick cooking spray. Set aside.
3.    In a medium saucepan, combine butter, Karo syrup, and Red Hots. Bring to a boil over medium heat, stirring very frequently, and then reduce heat to medium-low and boil for 5 minutes. Stir in the cinnamon oil and then pour over the popcorn, stirring with wooden spoons to evenly coat the popcorn in the candy mixture.
4.    Divide the popcorn evenly between the two baking sheets and spread in a single layer over each baking sheet. Bake for 30-35 minutes, stirring occasionally. Remove from the oven and allow to cool completely.
5.    In a microwave-safe jar or measuring cup, add the chocolate chips and the shortening. Heat for 30 seconds at a time, stirring each time, until the chocolate is smooth and liquidy. Using a fork, drizzle the chocolate over the popcorn and allow to harden. Break into pieces and serve or divide into bags to deliver as gifts.


*My own notes after trying their recipe. 
         1. I bought my red hots at Wal Mart. They looked a little pink instead of red.  I know WinCo has red hots in their bulk section and they look more red than the ones I had.  I didn't have much time the day I went to get supplies and Wal Mart was closer than WinCo.
        2.  Cinnamon oil- next time I will buy 2 pkgs of cinnamon oil.  Those little bottles don't have much in them.  I like more cinnamon flavor than the 1/2 tsp called for in the recipe.  Would have been nice to add a little more to each batch.  
       3.  I pop the popcorn on the stove top instead of buying microwave popcorn,  I think it tastes better and it's cheaper.  
       4.  Once I put the popcorn in the oven the cinnamon syrup tends to pool underneath the popcorn.  I stirred the popcorn a couple of times in the oven to get the syrup all over the popcorn and I did the same once it came out of the oven.  No sense in leaving all that syrup on the foil.  
       5.  Once the cinnamon oil is added to the syrup you might want to just lean back away from the stove a little.  Stirring in the oil tends to create this puff of steam that's pretty intense if you breathe it in right away.  

Monday, May 30, 2016

Banana Oatmeal Chocolate Chip Cookies

Ingredients

1 1/2 cups flour
1 cup sugar
1/2 tsp salt
1/2 tsp baking soda
1/4 tsp nutmeg
3/4 tsp cinnamon
3/4 cup shortening
1 egg
1 cup mashed bananas (about 3 bananas)
1 3/4 cup quick oats
1 pkg chocolate chips

Preheat oven to 350 °.   In a bowl mix together the flour, sugar, salt, baking soda, nutmeg and cinnamon.  In the bowl of a stand mixer add 1 beaten egg and the bananas and mix well.  Add shortening and mix together.  Add the dry ingredients (flour, sugar,salt, baking soda, nutmeg and cinnamon) and mix.  Add quick oats and chocolate chips.  Scoop out cooking onto a parchment lined baking sheet and bake for about 11 min.

Thursday, April 14, 2016

Snickerdoodles from Sis Sisters' Stuff

Ingredients
Dough:
  • 3 1⁄2 cups flour
  • 1⁄2 teaspoon baking soda
  • 1⁄2 teaspoon cream of tartar
  • 1 cup butter (2 sticks), room temperature
  • 2 cups sugar
  • 2 eggs
  • 1⁄4 cup milk
  • 1 teaspoon vanilla
Topping:
  • 3 tablespoons sugar
  • 1 teaspoon cinnamon
Instructions
  1. Preheat oven to 375 degrees F.
  2. In a large bowl, sift together the flour, baking soda and cream of tartar. Set aside.
  3. In a separate bowl, cream the butter and sugar until fluffy. Add the eggs, milk and vanilla. Mix well. Add the wet ingredients in with the dry ingredients and mix until everything is incorporated.
  4. In another small bowl, mix together cinnamon and sugar for the topping.
  5. Form the dough into 1 inch balls and roll in the cinnamon/sugar mixture. Place dough ball on a greased baking sheet and flatten (I used the bottom of a glass to lightly flatten my cookies).
  6. Sprinkle the tops of the cookies with additional cinnamon/sugar mixture, then bake for 7-8 minutes. Do not overbake these.
  7. Remove from oven and let cool on the cookie sheet for 1-2 minutes, then move to a wire rack to cool.
*I added extra flour to the dough to make them a little thicker- around 1/4-1/2 cup.  Bake one cookie to test it and see if you like how it baked. 

Sunday, March 6, 2016

Chocolate Chip Cookies from Lil Luna

Here is the link to go to the website http://lilluna.com/the-best-chocolate-chip-cookies-recipe/

Here is the recipe:
The Best Chocolate Chip Cookies Recipe
Ingredients:

  • 1 cup brown sugar
  • 1 cup sugar, softened
  • ½ cup butter
  • ½ cup oil
  • 2 eggs
  • 1 tsp. baking soda
  • 1 tsp. salt
  • 1 tsp. baking powder
  • 1 tsp. vanilla
  • 3 cups flour
  • 2 cups milk chocolate chips
Instructions
  1. Cream butter, oil and sugars. Add eggs and beat until fluffy.
  2. Add remaining ingredients.
  3. Bake at 350 for 7-8 minutes.

*Next time I make these I would add some extra flour  to make them a little thicker as well as some cinnamon.

*I made my cookies 1.5 oz each and they took a little longer to bake- around 9½ mintues.

Tuesday, December 29, 2015

Garlic Parmesan Breadsticks

Life in the Lofthouse Garlic Parmesan Breadsticks


GARLIC PARMESAN BREADSTICKS
Yields 12
Soft, buttery breadsticks topped with a garlic Parmesan seasoning. 

Prep Time
1 hr
Cook Time
12 min
INGREDIENTS
  1. 1 1/2 cups warm water (105 - 110 degrees F°)
  2. 1 Tablespoon instant yeast
  3. 1 Tablespoon granulated sugar
  4. 1/2 teaspoon salt
  5. 4 cups all-purpose flour
INSTRUCTIONS
  1. In a large bowl, or in the bowl of a stand-mixer, add warm water, instant yeast, sugar and salt. Stir to combine (using the dough hook if in the stand-mixer)
  2. Add 2 cups flour and mix well. Gradually add in the rest of the flour until dough pulls away from the sides of the bowl and sticks to your finger a little bit. (Remember to only add up to 4 cups flour total. Adding too much flour will make the breadsticks too dense and not soft.)
  3. Cover bowl and allow to rise 30 minutes or until doubled in size.
  4. Remove dough from bowl and place on a clean and lightly-floured surface. Spray a large baking sheet with non-stick spray. Roll dough into a large rectangle, about 1-inch thick, and cut into 12 strips with a pizza cutter.
  5. Roll out each piece of dough into a long rope then twist. Place dough twist onto prepared baking sheet and repeat with the rest of dough, placing side by side on baking sheet.
  6. Cover and let rest 30 minutes to rise again until doubled.
  7. Preheat oven to 425° F. Bake 10 to 12 minutes or until golden-brown. Remove from oven and rub a 1/2 stick of butter over the warm breadsticks. Sprinkle tops evenly with Garlic Bread Seasoning.


Adapted from Food Network Magazine/ Our Best Bites

GARLIC BREAD SEASONING
INGREDIENTS
  1. 1/2 cup powdered Parmesan cheese
  2. 1 teaspoon Kosher salt
  3. 2 Tablespoons garlic powder
  4. 2 teaspoons dried oregano
  5. 2 teaspoons dried basil
  6. 2 teaspoons dried parsley

INSTRUCTIONS
  1. Combine all ingredients in a small jar or container that has a lid. Stir mixture to combine and then seal shut with lid.
  2. Sprinkle on top of warm breadsticks OR combine 1 1/2 Tablespoons garlic bread seasoning with 1/2 cup softened butter and spread on a loaf of French bread (cut in 1/2 lengthwise). Wrap in foil and bake at 375 until butter’s melted. (You could also place it open-faced under the broiler for a few minutes, so it gets golden-brown and crispy)

Adapted from Our Best Bites

Wednesday, August 19, 2015

Chocolate Raspberry Cupcakes

1 White Cake Mix
1/2 cup baking cocoa
3 large eggs
1/3 cup canola oil/vegetable oil
1/2 cup thawed apple raspberry concentrate (found in the frozen juice section)
7/8 cup water
1 1/2 cups chocolate chips or diced raspberry chocolate orange

Icing:
1/3 cup butter- softened
2 cups powdered sugar
2 T. thawed apple raspberry concentrate

Beat cake mix, cocoa, eggs, oil, juice concentrate and water for 3 minutes on medium speed.  Fold in chocolate chips. Fill each muffin cup about 2/3 full.  ( I used a 1/4 cup measuring cup).  Bake at 350 degrees for about 17-20 minutes.  Cool completely on wire rack.

Icing:  Beat butter til light and fluffy.  Gradually add powered sugar, then juice.  Beat til smooth.  If not using right away store in fridge.  Let icing sit out and soften a little before using.  The icing is a very pale pink.  I used a large star tip to pipe icing on cupcake and then garnished with three fresh raspberries on each one.

* Last time I made this I accidentally used a stick of butter instead of the 1/3 cup that the recipe called for and it turned out fine.


Wednesday, June 17, 2015

Churro Apple Pie Waffles

from Chica Chocolatina

**When I made these I decided to not stuff the pie filling inside the waffles. I just put a little of the apple pie filling over the top of each waffle and then placed a scoop of vanilla ice cream on top of the pie filling. Also- we used a lot less cinnamon than the recipe calls for in the churro topping.  Next time I'd like to try these with peach pie filling.

   Ingredients
                                                                                                                               
4 teaspoons baking powder
1 teaspoon salt
2 tablespoons white sugar
2 eggs                                                                     
2 cups of all purpose flour
1 1/2 cups warm milk                                
1/3 cup butter, melted                                             
 1 teaspoon vanilla extract
 3 shakes of cinnamon

For the churro topping:
1 cup of white sugar
1/2 cup cinnamon ( 1/4 cup if you don't love cinnamon like I do)  
1/2 cup of melted butter


Apple Filling- 
1 can of Lucky Leaf Apples or any can you prefer
If your feeling really ambitious you can make your own apple filling.
                                                                 

 Directions
1.In a large bowl, mix together flour, salt, baking powder and sugar; set aside.  Also at this time you can combine your churro topping and set it aside. Preheat waffle iron
     
2.In a separate bowl, beat the eggs. Stir in the milk, butter and vanilla. Pour the milk mixture into the flour mixture;  Next fold in three shakes of cinnamon beat until blended
      
3. At this time you can also melt your 1/2 cup of butter used to pour over waffles. Next generously spray your waffle iron with no stick cooking spray. Than ladle a little batter into a preheated waffle iron, gently place on 4-5 apple slices ( depending on size of your waffle iron, smaller size use 2-3 apples.

4. Next add more batter on top of apples, be careful not to overflow waffle maker. Cook the waffles until golden and crisp. ( Caution, mixing the apples directly into the batter yielded undesirable results for me)

5.Once fully cooked immediately pour melted butter on each side of the waffle and than dip each buttered side into your cinnamon/sugar churro mixture.

Sunday, January 11, 2015

Lemon Blueberry Sweet Rolls

Lemon Blueberry Sweet Rolls 
Lemon Blueberry Sweet Rolls from Crazy for Crust

*I used the sweet roll recipe from America's Test Kitchen found here.  I reduced the amount of milk to 2/3 c  and added zest and lemon juice just like in the original recipe. Next time I would double the amount of filling (not blueberries) to get a little more lemon flavor coming through.  I used her cream cheese  frosting recipe and really liked it.  I used regular blueberries and they were big as far as blueberries go. When I sliced the dough into individual rolls some of the blueberries were cut and looked a little like olives. I just turned over any blueberries that had been sliced so they still looked like berries.  I made them the night before I needed them and baked them the following morning after letting them sit out and rise.  Turned out great!

Lemon Blueberry Sweet Rolls (taken directly from the website)


Prep Time: 45 minutes
Cook Time: 25 minutes
Total Time: 3 hours 20 minutes plus overnight rising
I used my favorite cinnamon roll recipe and turned it into a lemon sweet roll with blueberries! This is the perfect recipe to use up your lemon stash and it'll make the cold morning feel like spring!

Ingredients:

For the Dough:

  • 2/3 cup warm non-fat milk (think hot bath water, about 45 seconds in the microwave)
  • 1 package active dry yeast (about 2 1/4 teaspoons)
  • 1/3 cup + 1/2 teaspoon sugar, divided
  • 3 tablespoons unsalted butter, softened
  • 1/2 teaspoon salt
  • 1 egg
  • 1 teaspoon lemon zest (from 1 medium lemon)
  • 2 tablespoons fresh lemon juice (from 1 medium lemon)
  • 3 - 3 1/4 cups all-purpose flour, plus more for dusting
  • Paddle attachment & dough hook for your mixer

For the Filling:

  • 4 tablespoons unsalted butter, softened
  • 1/2 cup granulated sugar
  • 2 teaspoons lemon zest (from 1-2 medium lemons)
  • 2 tablespoons all-purpose flour
  • 1/4 teaspoon salt
  • 1-2 cups blueberries, fresh or frozen (if frozen, make sure they are thawed and drained), see note

For the Frosting:

  • 2 tablespoons butter, melted
  • 2 ounces cream cheese, very soft
  • 1 1/2 cups powdered sugar
  • Pinch salt
  • 3-4 teaspoon fresh lemon juice

Directions:

Make the Dough:

  1. Place milk in a microwave safe measuring cup. Heat for 45 seconds in the microwave, until it’s about 120°F, think hot bathwater. (The time you heat it will need to be adjusted depending on your microwave. You can use a candy or a meat thermometer to test the temperature.) Add yeast and 1/2 teaspoon sugar and stir. Let it sit for a few minutes until frothy.
  2. Place sugar, butter, salt, lemon juice, lemon zest, and egg in the bowl of a stand mixer fitted with the paddle attachment. Mix until the butter is distributed throughout the liquids, although it may be chunky. Pour in the milk/yeast mixture and stir for a few seconds.
  3. Add 3 cups flour and stir with the paddle attachment just until the mixture starts to stick to the paddle. Then replace the paddle with the dough hook. Continue mixing on low speed until the dough forms a ball in the center of the bowl. The dough will be slightly sticky and elastic. There will be minimal transfer to your finger if you poke it. If it’s still very wet, add up to 1/4 cup more flour, 1 tablespoon at a time.
  4. Spray a large bowl with cooking spray and place the dough in it. Spray the top of the dough ball with cooking spray (lightly) and cover the bowl with plastic wrap. Let sit for 2-4 hours until it doubles in size. Note on rising: if your house is warm, it should rise no problem. If it’s cold in your house, it may take longer for the dough to rise.

Prepare your Rolls:

  1. Stir together butter, sugar, lemon zest, salt and flour until it forms a paste.
  2. Once the dough is risen, roll it out on a lightly floured surface into a large rectangle, about 10” by 14”. Spread the filling as evenly as possible over the rectangle, making sure to reach to the sides so the outer rolls have enough filling. Sprinkle with blueberries. I used 1 cup of mini (or “wild”) blueberries that were defrosted and drained. If you’re using regular sized berries, you might want to use more of them.
  3. Roll the dough up tightly from the long end. Slice it into 12 equal rounds. Place the rolls into a 9x13” pan that has been sprayed with cooking spray.
  4. Cover the rolls with plastic wrap and refrigerate overnight. (Or, if you want to make them  the same day, cover with plastic wrap and let them sit for 1 hour until they’ve puffed up a little, then continue as directed below.)
  5. When ready to bake, preheat oven to 350°F. Remove the rolls from the refrigerator and let them warm up to room temperature while the oven is preheating. Remove the plastic wrap and bake for 23-28 minutes, or until they are golden brown. (Mine took 24, be careful not to over bake. The bottoms will turn golden before the tops do.) Note: the blueberries will drain to the bottom of the pan overnight. That’s not a problem.

Make the frosting:

  1. Whisk the melted butter and softened cream cheese until mostly smooth. If your cream cheese is too stiff, you can use a hand mixer. Whisk/beat in powdered sugar and 3 teaspoons lemon juice, adding more as desired for thickness. Pour over warm rolls and serve.

Notes:

Note about blueberries: I prefer to use mini blueberries in my baking, as it's what my family prefers. They are often labeled "wild" and they are smaller than normal berries. You can often find them at Trader Joe's or Whole Foods. You can use regular sized berries, fresh or frozen, but make sure frozen berries are thawed and drained. Use 1-2 cups, deepening on how many berries you want in your rolls.

Thursday, September 11, 2014

Red Chile Sauce Chicken Enchiladas

From Mel's Kitchen Cafe- these are sweeter than most enchilada recipes I have tried. I left out the jalapeno pepper.


Red Chile Sauce Chicken Enchiladas
Yield: Makes 12 enchiladas
Ingredients
  • 1 medium onion, chopped fine
  • 1 jalapeno, seeded and chopped fine
  • 1 teaspoon canola oil
  • 3 medium cloves garlic, minced
  • 2 tablespoons chili powder
  • 2 teaspoons ground cumin
  • 3 teaspoons sugar
  • 2 (8-oz) cans tomato sauce
  • 1 cup water
  • 1 1/2 pounds boneless, skinless chicken breasts (about 3 large chicken breasts)
  • 1 cup shredded sharp cheddar cheese
  • 1 cup shredded Monterey jack cheese
  • 1/2 cup minced fresh cilantro
  • 12 (6-inch) soft corn or flour tortillas (fajita-size for flour tortillas)
  • cooking spray
  • salt and ground black pepper
Directions
  1. In a large saucepan, combine the onion, jalapeno, 1/2 teaspoon salt, and oil. Cover and cook over medium-low heat, stirring often, until the onions and peppers have softened, 8-10 minutes. Stir in the garlic, chili powder, cumin, and sugar, and cook until fragrant, less than 30 seconds. Stir in the tomato sauce and water. Bring to a simmer.
  2. Nestle the chicken into the sauce. Reduce heat to low, cover, and cook until chicken is cooked through, about 12-20 minutes, depending on the size and thickness of the chicken breasts you are using. Transfer the chicken to a plate, and set aside to cool. Continue to simmer the sauce over medium heat until slightly thickened, about 5 minutes.
  3. Strain the sauce through a strainer into a medium bowl, pressing the onion mixture to extract as much liquid as possible. Season sauce with additional salt and pepper to taste. Transfer the leftover onion mixture from the strainer to a large bowl and set aside.
  4. Shred the chicken into bite-sized pieces. Add to the onion mixture in the large bowl. Also stir in 1/4 cup of the enchilada sauce, 1/2 cup cheddar cheese, 1/2 cup Monterey Jack cheese and the cilantro. Toss to combine.
  5. Stack the tortillas on a plate and cover with plastic wrap; Microwave on high until warm and pliable, 40-60 seconds. Spread the tortillas on a clean work surface, and spoon 1/3 cup of the chicken mixture evenly down the center of each. Tightly roll each tortilla and lay seam-side down in a greased 9×13 inch baking dish.
  6. Heat oven to 400 F. Pour the enchilada sauce evenly over the top of the enchiladas. Top with the remaining cheese. Cover dish with foil and bake 20 minutes, or until heated through.
  7. Remove foil and bake another 5 minutes, until cheese browns. Remove from oven and let stand 10 minutes before serving.
  8. Serve with sour cream, guacamole, salsa, additional cilantro, if desired.
Notes
Make Ahead Instructions: Follow the recipe, letting the sauce, onions and chicken come to room temperature before assembling the enchiladas. Finish following the recipe instructions and instead of baking, cover the pan with a layer of tin foil and refrigerate for up to 12 hours. Bake covered for 20 minutes, uncover and bake an additional 5-10 minutes. Alternately, the assembled enchiladas can be covered with a double layer of tin foil and put inside a jumbo-size ziploc bag (if you don’t have a jumbo-sized bag, make sure the edges of the pan are sealed well with tin foil). Freeze for up to 2-3 months. Bake from frozen, baking for 1 1/2 hours covered at 350 degrees F. Uncover and bake an additional hour until hot and bubbly.


Monday, May 26, 2014

Heavenly Blueberry and Cream Angel Dessert

From Mel's Kitchen Cafe

Ingredients
    Blueberry Filling:
  • 12 ounces frozen blueberries
  • 2 tablespoons granulated sugar
  • 2 tablespoons cornstarch
  • 1/4 cup cold water
  • Squeeze of fresh lemon juice (about 1/2 tablespoon) 
  •  
  • Cake and Cream:
  • Baked, cooled and cubed angel food cake 
  • 16 ounces light cream cheese, softened to room temperature
  • 2/3 cup half-and-half or evaporated milk (can use skim evaporated milk)
  • 2/3 cup granulated sugar 
  •  
  • Whipped Cream:
  • 1 1/2 cups heavy cream
  • 3 tablespoons powdered sugar
Directions
  1. For the blueberry filling, in a medium saucepan, combine the blueberries, sugar, cornstarch, water and lemon juice. Bring the mixture to a simmer and cook until thickened, 5-7 minutes, stirring often. Remove from the heat and let cool to room temperature.
  2. For the cake and cream layer, in a blender or with an electric mixer (handheld or stand mixer), whip together the cream cheese, half-and-half or evaporated milk and sugar until smooth and creamy. Transfer the mixture to a bowl if you used a blender. Fold in the angel food cake cubes. Keep in mind (from the note above) that you may not use all the cake cubes, especially if using an angel food cake mix. Add cake cubes until they are all thickly coated with a layer of cream. If making this in advance, it can dry out if there is too much angel food cake added.
  3. For the whipped cream, beat together the heavy cream and powdered sugar until peaks form.
  4. To assemble, in a trifle dish or in a large glass bowl, spread half of the angel food cake mixture. Top with half of the blueberries, spreading evenly across, and then spread half of the sweetened whipped cream. Repeat the layers.
  5. Cover and refrigerate at least 2 hours or up to 24 hours. Serve chilled.

Tuesday, May 6, 2014

How to soften butter in the microwave

This is so great! It works every time. 
Place the butter on one end and microwave for 4 seconds.  Then turn it on the other end and microwave for another 4 seconds.  Then lay it flat and microwave for 4 seconds.  Then flip it over to the opposite side and microwave for another 4 seconds.

If I'm using margarine I shorten the time to 3 seconds.