Thursday, October 12, 2017

Soft Chocolate Chip Cookies from Pinch of Yum

This recipe has come up on Pinterest and Facebook so I decided to give it a try.  (Actually my daughter tried it) We really liked it! Here's the link to the website  Best Soft Chocolate Chip Cookies
The following was taken directly from the website:

INGREDIENTS

  • 8 tablespoons of salted butter
  • 1/2 cup white sugar (I like to use raw cane sugar with a coarser texture)
  • 1/4 cup packed light brown sugar
  • 1 teaspoon vanilla
  • 1 egg
  • 1 1/2 cups all purpose flour (more as needed – see video)
  • 1/2 teaspoon baking soda
  • 1/4 teaspoon salt (but I always add a little extra)
  • 3/4 cup chocolate chips (I use a combination of chocolate chips and chocolate chunks)

INSTRUCTIONS

  1. Preheat the oven to 350 degrees. Microwave the butter for about 40 seconds to just barely melt it. It shouldn’t be hot – but it should be almost entirely in liquid form.
  2. Using a stand mixer or electric beaters, beat the butter with the sugars until creamy. Add the vanilla and the egg; beat on low speed until just incorporated – 10-15 seconds or so (if you beat the egg for too long, the cookies will be stiff).
  3. Add the flour, baking soda, and salt. Mix until crumbles form. Use your hands to press the crumbles together into a dough. It should form one large ball that is easy to handle (right at the stage between “wet” dough and “dry” dough). Add the chocolate chips and incorporate with your hands.
  4. Roll the dough into 12 large balls (or 9 for HUGELY awesome cookies) and place on a cookie sheet. Bake for 9-11 minutes until the cookies look puffy and dry and just barely golden.Warning, friends: DO NOT OVERBAKE. This advice is probably written on every cookie recipe everywhere, but this is essential for keeping the cookies soft. Take them out even if they look like they’re not done yet (see picture in the post). They’ll be pale and puffy.
  5. Let them cool on the pan for a good 30 minutes or so. They will sink down and turn into these dense, buttery, soft cookies that are the best in all the land. These should stay soft for many days if kept in an airtight container. 

NOTES

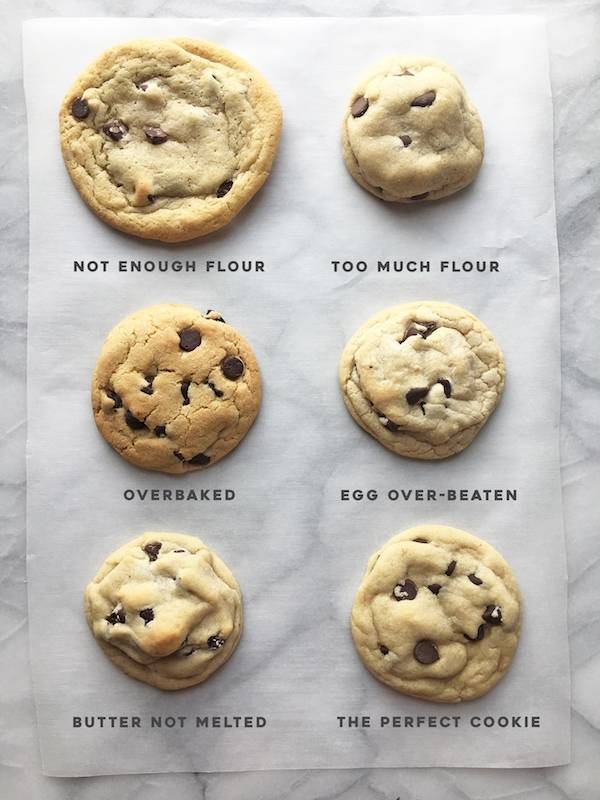
The 3 most important things about this recipe are 1) melting the butter, 2) adding enough flour, and 3) not baking for too long.
If you find that the dough is wet and it REALLY sticks to your hands, you probably need a little more flour. This is important otherwise you’ll have flat cookies. I’ll usually add a few tablespoons at a time to get it to the right consistency. See video in post for reference. You should be able to roll the balls of dough between your hands without any issues.
One of the keys to achieving the perfect cookie is to ensure the correct amount of flour is used. Ideally, the flour should be weighed. In testing, we found that 6.75 ounces of flour was the correct amount. Without a food scale, don’t pack the flour into measuring cups and always level the flour off.
 

One Pan Sausage and Tortellini from Six Sisters' Stuff


INGREDIENTS

  • 2 tablespoons olive oil
  • 1 pound ground sausage
  • 3 cups spaghetti sauce or marinara sauce
  • 3/4 cup water
  • 1 teaspoon Italian seasoning
  • 20 ounces fresh tortellini
  • 1 cup mozzarella cheese, shredded
  • 1/2 cup parmesan cheese, grated
INSTRUCTIONS
  1. Heat olive oil in a skillet. Add in the sausage, crumbling it into small pieces. Cook until browned well. Drain off any excess grease.
  2. Stir in spaghetti sauce, water, Italian seasoning, and tortellini. Bring mixture to a boil.
  3. Then turn heat to low, cover and simmer for about 8 minutes until tortellini is tender.
  4. Remove from heat and stir in mozzarella cheese and parmesan cheese. It will melt in with the warm tortellini pasta.
  5. Optional - you can sprinkle additional cheese on top before serving.

** The first time I made this I didn't really like it, but I decided to try it again.  The second time I made it I used Italian sausage instead of plain sausage, and I used frozen cheese tortellini from WinCo because it was way cheaper than fresh tortellini.  I liked it a lot better the second time and the family ate all the leftovers.  

Tuesday, September 5, 2017

Buttermilk Waffles from America's Test Kitchen Family Cookbook


Image result for picture of waffles
Makes 6-8 waffles depending on the size of the waffle iron

2 cups all purpose flour
1 teaspoon salt
1/2 teaspoon baking soda
2 large eggs, separated
4 tablespoons unsalted butter, melted
1 3/4 cups buttermilk*
pinch of cream of tartar

After heating the waffle iron whisk together flour, salt and baking soda in a large bowl. In a separate bowl whisk together the egg yolks, butter and then the buttermilk. Beat the egg whites and cream of tartar with an electric mixer on medium high speed til stiff peaks form, about 2 minutes. Make  a well in the center of the dry ingredients, pour the buttermilk mixture into the dry ingredients and whisk very gently just til incorporated.  A few lumps should remain.  Fold the whipped egg whites into the batter.

*If you don't have buttermilk you can add 2 tablespoons of white vinegar or lemon juice to the 1 3/4 c milk and let it sit for about 5 minutes.

The batter should be lumpy. If you overmix the batter you will have heavy dense waffles.

Tuesday, July 18, 2017

Sweet Pork Chimichangas from Six Sisters' Stuff

Ingredients
  • 1 (2-3 pound) pork roast*
  • 2 cups chunky salsa**
  • 1 (12 ounce) can Dr. Pepper**
  • 2 cups brown sugar**
  • 8 flour tortillas
  • 1 (16 ounce) can refried beans
  • 2 cups shredded cheddar cheese
  • nonstick cooking spray
* I shop for pork labeled carnitas or  pork shoulder butt
(**I cut the sauce ingredients in half.  It's still plenty of sauce.)
Instructions
  1. Place pork roast in slow cooker and fill halfway with water. Cook 4 hours on high.
  2. Drain water, cut pork into thirds, mix salsa, Dr. Pepper and brown sugar together, pour on top of pork and cook for 4 more hours on low.
  3. For chimichangas: Drain liquid and shred pork. Save some liquid and mix it back in with the pork to keep it moist.
    - For tacos, shred pork and stir with sauce, do not drain.

    If making chimichangas:
  1. Preheat oven to 350 degrees F.
  2. Evenly divide pork, refried beans and cheese between 8 tortillas.
  3. Fold up each tortilla into a rectangular packet around the filling and place folded side down in a 9x13-inch baking dish.
  4. Spray the tops of the chimichangas generously with nonstick cooking spray.
  5. Place in preheated oven and bake for 15 minutes.
  6. Remove from oven, turn over each chimichanga and return to the oven to cook for an additional 15 minutes. 

Thursday, June 1, 2017

Chicken Broccoli Alfredo

This recipe is adapted  from the following website
http://juliasalbum.com/2015/09/chicken-broccoli-alfredo-recipe/


Ingredients
·         1 bag frozen broccoli florets
   1 lb fettuccine noodles or  8 oz of penne pasta
·         1 tablespoon canola oil
·         1-2 chicken breasts, depending on their size and how much chicken you like
·         4 garlic cloves, minced

Sauce
 (Taken from Chef in Training)
  • ½ cup butter
  • 2 garlic cloves, minced
  • 2 cups heavy cream
  • ¼ teaspoon white pepper
  • ¼ teaspoon salt
  • 1½ cups freshly grated Parmesan cheese (not the grated stuff from a jar/plastic container due to the celluose added to prevent clumping)
*I buy a block of parmesan cheese and grate it right before I used it

Instructions
1.      Put broccoli in a microwaveable dish.  Add 2 tablespoons of water, cover with a lid and cook for 5 minutes.  After it's done cooking, keep it covered and set to the side
2.      Cook pasta al dente, (about 10 minutes) drain.  (While I was cooking the chicken and the sauce I would occasionally run the noodles under hot water to keep them from drying out and sticking together)
3.      In a large skillet heat olive oil and butter on medium-high heat (until hot but not smoking) and saute chicken breast (seasoned generously with salt and pepper on both sides) until the internal temperature is 160 degrees.  Remove the skillet from heat, cover with the lid, and let the chicken rest. Once the sauce has is ready  cut the chicken into either strips or chunks. 
4.      Add minced garlic to the same skillet and cook it in chicken juices and oil remaining in the pan, scraping up the chicken bits from the bottom of the pan, on medium heat for about 30 seconds until garlic is fragrant, making sure to avoid burning. Drain any liquid from the broccoli  and mix in with garlic. Cook for about 1 minutes. Remove from the pan.

To make the sauce:
  1. In a  clean medium sauce pan over medium heat melt butter. Add garlic, cream, pepper, and salt.
  2. Bring to a low boil and reduce heat to medium low and simmer for 8 minutes, stirring constantly.
  3. Remove from heat and slowly add cheese.
  4. Return to stove on low and cook for 2 to 3 minutes, stirring constantly.
     Add cooked pasta to the creamy sauce, then add broccoli. Taste and season with salt and pepper. Top with sliced, cooked chicken.


Monday, March 20, 2017

Lemonies from Mel's Kitchen Cafe

Lemony Lemon Brownie Bites


These taste just like lemon bars, but are way easier to make!


INGREDIENTS
    Lemon Batter:
  • 1 cup (5 ounces/142 grams) all-purpose flour
  • 3/4 cup (5.5 ounces/155 grams) sugar
  • 1/4 teaspoon salt
  • 1/4 teaspoon baking powder
  • 1 tablespoon lemon zest (from 1 large lemon)
  • 1 stick (8 tablespoons) butter, melted and cooled
  • 2 large eggs
  • 1 large egg yolk
  • 3 tablespoons fresh lemon juice
  • 1 teaspoon vanilla extract
  • Lemon Glaze:
  • 3/4 cup (2.75 ounces/75 grams) powdered sugar
  • 1 tablespoon fresh lemon juice
  • 1/2 teaspoon lemon zest
DIRECTIONS
  1. Preheat the oven to 350 degrees F. Line an 8X8-inch aluminum baking pan with parchment so that it hangs over two of the edges (to lift out the bars later - alternately, you can just grease the pan really well and slice them in the pan) and lightly coat the pan and parchment with nonstick cooking spray.
  2. In a large bowl, whisk together the flour, sugar, salt, baking powder and lemon zest.
  3. In a separate bowl or in a large liquid measuring cup, whisk together the butter, eggs and egg yolk, lemon juice and vanilla.
  4. Stir the wet ingredients into the flour mixture and mix until combined.
  5. Spread the batter evenly in the prepared pan.
  6. Bake for 18-20 minutes until a toothpick inserted in the center comes out clean or with moist crumbs (the top of the bars should spring back lightly when gently pressed). Don't over bake or they might be dry.
  7. For the glaze, whisk together the powdered sugar, lemon juice and lemon zest until smooth and combined.
  8. After the bars have cooled completely in the pan, drizzle the glaze over the top (since the glaze layer is thin, it helps to pour it all across the bars instead of in one puddle before spreading) and use an offset spatula or knife to spread evenly over the bars.
  9. Place the bars in the refrigerator for 1-2 hours to let the glaze set before lifting them from the pan (using the parchment overhang) and cutting into small squares. These taste best chilled, in my opinion, but can be served at room temperature also.

Recipe Source: adapted from Bakerella (cut down the butter, added weight measurements, used an extra egg yolk for super moistness, cut the glaze in half, etc)