Showing posts with label Dessert. Show all posts

Wednesday, December 15, 2021

Chocolate Raspberry Cheesecake

Cheesecake filling:

 1 chocolate pie crust (I usually buy an Oreo crust)

1  8 oz package cream cheese, room temp (let sit on counter for 30 minutes to 1 hour)

1 can(14 oz) sweetened condensed milk

1 egg

3 tablespoons lemon juice

1 tsp. vanilla

1 cup fresh/frozen raspberries


Chocolate glaze:

2 oz semi sweet chocolate chips

1/4 cup whipping cream


Preheat oven to 350. With mixer, beat cream cheese until fluffy; gradually beat in sweetened condensed milk until smooth.  Add egg, lemon juice, and vanilla; mix well.  

Place raspberries on the bottom of the crust. Slowly pour cheesecake mixture over fruit.  Bake 30 to 35 minutes or until the center is set.  

Cool cheesecake completely.  Heat whipping cream on stovetop or microwave (don't let boil) and pour over chocolate chips. Whisk until combined. Pour over top of cheesecake and store in fridge.

Wednesday, January 16, 2019

Chocolate Chip Bar Cookies

From Mel's Kitchen Cafe


INGREDIENTS

  •  12 tablespoons butter (1 1/2 sticks), melted and cooled slightly
  •  1/2 teaspoon salt
  •  1/2 teaspoon baking soda
  •  1 cup (7 ounces) light brown sugar
  •  1/2 (3 1/2 ounces) cup granulated sugar
  •  1 large egg
  •  1 large egg yolk
  •  2 teaspoons vanilla extract
  •  2 cups + 2 tablespoons (10 1/2 ounces) all purpose flour
  •  2 cups chocolate chips or chocolate chunks (semisweet, bittersweet, milk, white, peanut butter…the options are endless!)

INSTRUCTIONS

  1. Preheat the oven to 325 degrees. Adjust the oven rack to lower-middle position. Line a 9X13-inch baking pan with foil, letting the excess hang over the edges of the pan by about 1 inch so you can grab those edges and pull the brownies from the pan after they have baked. Spray the foil-lined pan with nonstick cooking spray.
  2. In a large bowl, whisk together the melted butter, salt and baking soda together until well combined. Add the brown sugar and granulated sugar and stir until evenly combined. Add the egg, egg yolk, and vanilla and mix well.
  3. Add the flour. Using a rubber spatula or wooden spoon start folding the flour into the wet ingredients. After a few stirs (with streaks of flour remaining), add the chocolate chips or chocolate chunks and mix until combined. Don't overmix, just stir until no dry streaks remain (sometimes I use my hands as the dough gets thick).
  4. Press the batter evenly into the prepared pan.
  5. Bake until the bars are light golden brown on the edges, slightly firm to the touch, and edges start pulling away from sides of pan, 24-28 minutes. Cool on a wire rack to room temperature. Remove the bars from the pan by lifting the foil overhang and transfer them to a cutting board. Cut into squares and serve.

Friday, March 23, 2018

Lemon Bundt Cake


From Chef in Training

Ingredients
  • 1 box lemon Cake Mix
  • 1 small box INSTANT Vanilla pudding Mix (3.9 ounces)
  • ½ cup Sour Cream
  • ¾ cup Oil
  • ¾ cup Water
  • ½ cup Sugar
  • 4 Eggs
  • 1 Tablespoon lemon zest
  • 3 Tablespoon lemon juice
FROSTING
  • 8 ounce cream cheese, softened
  • 2 cups powdered sugar
  • 1 Tablespoon lemon zest
  • 1 teaspoon lemon juice
Instructions
  1. Preheat oven to 350 degrees F.
  2. In a large bowl, mix all ingredients together for 3 minutes on high. Pour into a greased bundt pan.
  3. Bake for 45-50 minutes or until a toothpick comes out clean. Let sit in pan for 5 minutes, then invert onto a cooling rack.
WHILE CAKE IS COOLING MAKE FROSTING.
  1. In a medium bowl combine cream cheese, powdered sugar, lemon zest and lemon juice and beat on high until creamy.
  2. Scoop frosting into a large ziplock bag and cut a hole in the corner of the bag, you can also use a piping bag with a large round tip as well.
  3. When cake is cooled, pipe the frosting over the top of the cake. Garnish with more lemon zest if desired.

LEAVE A COMMENT 


Thursday, October 12, 2017

Soft Chocolate Chip Cookies from Pinch of Yum

This recipe has come up on Pinterest and Facebook so I decided to give it a try.  (Actually my daughter tried it) We really liked it! Here's the link to the website  Best Soft Chocolate Chip Cookies
The following was taken directly from the website:

INGREDIENTS

  • 8 tablespoons of salted butter
  • 1/2 cup white sugar (I like to use raw cane sugar with a coarser texture)
  • 1/4 cup packed light brown sugar
  • 1 teaspoon vanilla
  • 1 egg
  • 1 1/2 cups all purpose flour (more as needed – see video)
  • 1/2 teaspoon baking soda
  • 1/4 teaspoon salt (but I always add a little extra)
  • 3/4 cup chocolate chips (I use a combination of chocolate chips and chocolate chunks)

INSTRUCTIONS

  1. Preheat the oven to 350 degrees. Microwave the butter for about 40 seconds to just barely melt it. It shouldn’t be hot – but it should be almost entirely in liquid form.
  2. Using a stand mixer or electric beaters, beat the butter with the sugars until creamy. Add the vanilla and the egg; beat on low speed until just incorporated – 10-15 seconds or so (if you beat the egg for too long, the cookies will be stiff).
  3. Add the flour, baking soda, and salt. Mix until crumbles form. Use your hands to press the crumbles together into a dough. It should form one large ball that is easy to handle (right at the stage between “wet” dough and “dry” dough). Add the chocolate chips and incorporate with your hands.
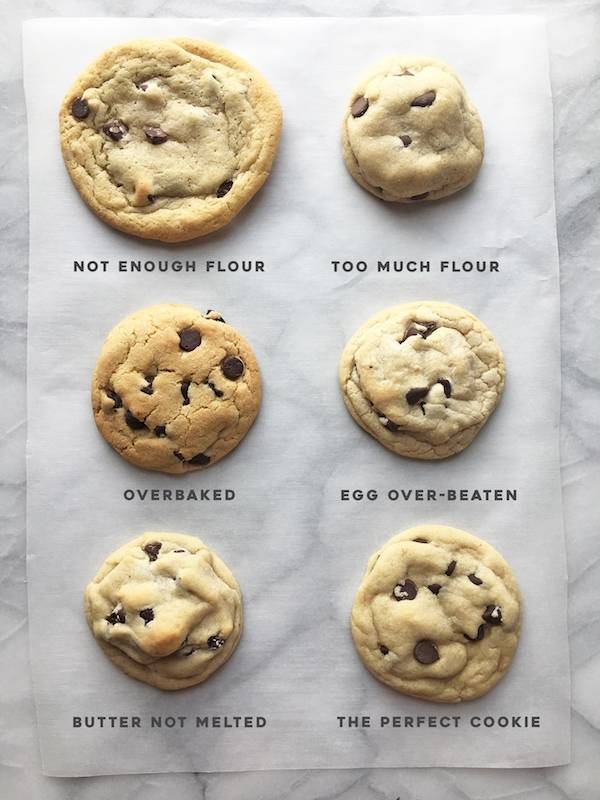
  4. Roll the dough into 12 large balls (or 9 for HUGELY awesome cookies) and place on a cookie sheet. Bake for 9-11 minutes until the cookies look puffy and dry and just barely golden.Warning, friends: DO NOT OVERBAKE. This advice is probably written on every cookie recipe everywhere, but this is essential for keeping the cookies soft. Take them out even if they look like they’re not done yet (see picture in the post). They’ll be pale and puffy.
  5. Let them cool on the pan for a good 30 minutes or so. They will sink down and turn into these dense, buttery, soft cookies that are the best in all the land. These should stay soft for many days if kept in an airtight container. 

NOTES

The 3 most important things about this recipe are 1) melting the butter, 2) adding enough flour, and 3) not baking for too long.
If you find that the dough is wet and it REALLY sticks to your hands, you probably need a little more flour. This is important otherwise you’ll have flat cookies. I’ll usually add a few tablespoons at a time to get it to the right consistency. See video in post for reference. You should be able to roll the balls of dough between your hands without any issues.
One of the keys to achieving the perfect cookie is to ensure the correct amount of flour is used. Ideally, the flour should be weighed. In testing, we found that 6.75 ounces of flour was the correct amount. Without a food scale, don’t pack the flour into measuring cups and always level the flour off.
 

Monday, March 20, 2017

Lemonies from Mel's Kitchen Cafe

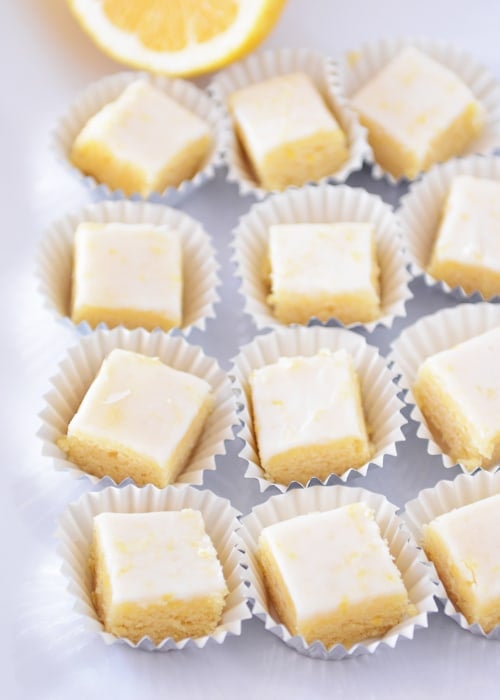
Lemony Lemon Brownie Bites


These taste just like lemon bars, but are way easier to make!


INGREDIENTS
    Lemon Batter:
  • 1 cup (5 ounces/142 grams) all-purpose flour
  • 3/4 cup (5.5 ounces/155 grams) sugar
  • 1/4 teaspoon salt
  • 1/4 teaspoon baking powder
  • 1 tablespoon lemon zest (from 1 large lemon)
  • 1 stick (8 tablespoons) butter, melted and cooled
  • 2 large eggs
  • 1 large egg yolk
  • 3 tablespoons fresh lemon juice
  • 1 teaspoon vanilla extract
  • Lemon Glaze:
  • 3/4 cup (2.75 ounces/75 grams) powdered sugar
  • 1 tablespoon fresh lemon juice
  • 1/2 teaspoon lemon zest
DIRECTIONS
  1. Preheat the oven to 350 degrees F. Line an 8X8-inch aluminum baking pan with parchment so that it hangs over two of the edges (to lift out the bars later - alternately, you can just grease the pan really well and slice them in the pan) and lightly coat the pan and parchment with nonstick cooking spray.
  2. In a large bowl, whisk together the flour, sugar, salt, baking powder and lemon zest.
  3. In a separate bowl or in a large liquid measuring cup, whisk together the butter, eggs and egg yolk, lemon juice and vanilla.
  4. Stir the wet ingredients into the flour mixture and mix until combined.
  5. Spread the batter evenly in the prepared pan.
  6. Bake for 18-20 minutes until a toothpick inserted in the center comes out clean or with moist crumbs (the top of the bars should spring back lightly when gently pressed). Don't over bake or they might be dry.
  7. For the glaze, whisk together the powdered sugar, lemon juice and lemon zest until smooth and combined.
  8. After the bars have cooled completely in the pan, drizzle the glaze over the top (since the glaze layer is thin, it helps to pour it all across the bars instead of in one puddle before spreading) and use an offset spatula or knife to spread evenly over the bars.
  9. Place the bars in the refrigerator for 1-2 hours to let the glaze set before lifting them from the pan (using the parchment overhang) and cutting into small squares. These taste best chilled, in my opinion, but can be served at room temperature also.

Recipe Source: adapted from Bakerella (cut down the butter, added weight measurements, used an extra egg yolk for super moistness, cut the glaze in half, etc)


Thursday, December 15, 2016

Chocolate Covered Cinnamon Bear Popcorn from Our Best Bites


Ingredients
1.    16 cups popped popcorn (about 2 bags microwave popcorn)
2.    1 cup butter
3.    1/3 cup Karo syrup
4.    2 cups Red Hot candies
5.    1/2 teaspoon cinnamon oil (more or less to taste)
6.    1 cup chocolate chips
7.    1 tablespoon shortening
Instructions
1.    Place the popcorn in a very large, heat-safe bowl and set aside.
2.    Preheat oven to 275 degrees F. Line 2 baking sheets with aluminum foil and grease or spray with non-stick cooking spray. Set aside.
3.    In a medium saucepan, combine butter, Karo syrup, and Red Hots. Bring to a boil over medium heat, stirring very frequently, and then reduce heat to medium-low and boil for 5 minutes. Stir in the cinnamon oil and then pour over the popcorn, stirring with wooden spoons to evenly coat the popcorn in the candy mixture.
4.    Divide the popcorn evenly between the two baking sheets and spread in a single layer over each baking sheet. Bake for 30-35 minutes, stirring occasionally. Remove from the oven and allow to cool completely.
5.    In a microwave-safe jar or measuring cup, add the chocolate chips and the shortening. Heat for 30 seconds at a time, stirring each time, until the chocolate is smooth and liquidy. Using a fork, drizzle the chocolate over the popcorn and allow to harden. Break into pieces and serve or divide into bags to deliver as gifts.


*My own notes after trying their recipe. 
         1. I bought my red hots at Wal Mart. They looked a little pink instead of red.  I know WinCo has red hots in their bulk section and they look more red than the ones I had.  I didn't have much time the day I went to get supplies and Wal Mart was closer than WinCo.
        2.  Cinnamon oil- next time I will buy 2 pkgs of cinnamon oil.  Those little bottles don't have much in them.  I like more cinnamon flavor than the 1/2 tsp called for in the recipe.  Would have been nice to add a little more to each batch.  
       3.  I pop the popcorn on the stove top instead of buying microwave popcorn,  I think it tastes better and it's cheaper.  
       4.  Once I put the popcorn in the oven the cinnamon syrup tends to pool underneath the popcorn.  I stirred the popcorn a couple of times in the oven to get the syrup all over the popcorn and I did the same once it came out of the oven.  No sense in leaving all that syrup on the foil.  
       5.  Once the cinnamon oil is added to the syrup you might want to just lean back away from the stove a little.  Stirring in the oil tends to create this puff of steam that's pretty intense if you breathe it in right away.  

Thursday, April 14, 2016

Snickerdoodles from Sis Sisters' Stuff

Ingredients
Dough:
  • 3 1⁄2 cups flour
  • 1⁄2 teaspoon baking soda
  • 1⁄2 teaspoon cream of tartar
  • 1 cup butter (2 sticks), room temperature
  • 2 cups sugar
  • 2 eggs
  • 1⁄4 cup milk
  • 1 teaspoon vanilla
Topping:
  • 3 tablespoons sugar
  • 1 teaspoon cinnamon
Instructions
  1. Preheat oven to 375 degrees F.
  2. In a large bowl, sift together the flour, baking soda and cream of tartar. Set aside.
  3. In a separate bowl, cream the butter and sugar until fluffy. Add the eggs, milk and vanilla. Mix well. Add the wet ingredients in with the dry ingredients and mix until everything is incorporated.
  4. In another small bowl, mix together cinnamon and sugar for the topping.
  5. Form the dough into 1 inch balls and roll in the cinnamon/sugar mixture. Place dough ball on a greased baking sheet and flatten (I used the bottom of a glass to lightly flatten my cookies).
  6. Sprinkle the tops of the cookies with additional cinnamon/sugar mixture, then bake for 7-8 minutes. Do not overbake these.
  7. Remove from oven and let cool on the cookie sheet for 1-2 minutes, then move to a wire rack to cool.
*I added extra flour to the dough to make them a little thicker- around 1/4-1/2 cup.  Bake one cookie to test it and see if you like how it baked. 

Sunday, March 6, 2016

Chocolate Chip Cookies from Lil Luna

Here is the link to go to the website http://lilluna.com/the-best-chocolate-chip-cookies-recipe/

Here is the recipe:
The Best Chocolate Chip Cookies Recipe
Ingredients:

  • 1 cup brown sugar
  • 1 cup sugar, softened
  • ½ cup butter
  • ½ cup oil
  • 2 eggs
  • 1 tsp. baking soda
  • 1 tsp. salt
  • 1 tsp. baking powder
  • 1 tsp. vanilla
  • 3 cups flour
  • 2 cups milk chocolate chips
Instructions
  1. Cream butter, oil and sugars. Add eggs and beat until fluffy.
  2. Add remaining ingredients.
  3. Bake at 350 for 7-8 minutes.

*Next time I make these I would add some extra flour  to make them a little thicker as well as some cinnamon.

*I made my cookies 1.5 oz each and they took a little longer to bake- around 9½ mintues.

Wednesday, August 19, 2015

Chocolate Raspberry Cupcakes

1 White Cake Mix
1/2 cup baking cocoa
3 large eggs
1/3 cup canola oil/vegetable oil
1/2 cup thawed apple raspberry concentrate (found in the frozen juice section)
7/8 cup water
1 1/2 cups chocolate chips or diced raspberry chocolate orange

Icing:
1/3 cup butter- softened
2 cups powdered sugar
2 T. thawed apple raspberry concentrate

Beat cake mix, cocoa, eggs, oil, juice concentrate and water for 3 minutes on medium speed.  Fold in chocolate chips. Fill each muffin cup about 2/3 full.  ( I used a 1/4 cup measuring cup).  Bake at 350 degrees for about 17-20 minutes.  Cool completely on wire rack.

Icing:  Beat butter til light and fluffy.  Gradually add powered sugar, then juice.  Beat til smooth.  If not using right away store in fridge.  Let icing sit out and soften a little before using.  The icing is a very pale pink.  I used a large star tip to pipe icing on cupcake and then garnished with three fresh raspberries on each one.

* Last time I made this I accidentally used a stick of butter instead of the 1/3 cup that the recipe called for and it turned out fine.


Wednesday, June 17, 2015

Churro Apple Pie Waffles

from Chica Chocolatina

**When I made these I decided to not stuff the pie filling inside the waffles. I just put a little of the apple pie filling over the top of each waffle and then placed a scoop of vanilla ice cream on top of the pie filling. Also- we used a lot less cinnamon than the recipe calls for in the churro topping.  Next time I'd like to try these with peach pie filling.

   Ingredients
                                                                                                                               
4 teaspoons baking powder
1 teaspoon salt
2 tablespoons white sugar
2 eggs                                                                     
2 cups of all purpose flour
1 1/2 cups warm milk                                
1/3 cup butter, melted                                             
 1 teaspoon vanilla extract
 3 shakes of cinnamon

For the churro topping:
1 cup of white sugar
1/2 cup cinnamon ( 1/4 cup if you don't love cinnamon like I do)  
1/2 cup of melted butter


Apple Filling- 
1 can of Lucky Leaf Apples or any can you prefer
If your feeling really ambitious you can make your own apple filling.
                                                                 

 Directions
1.In a large bowl, mix together flour, salt, baking powder and sugar; set aside.  Also at this time you can combine your churro topping and set it aside. Preheat waffle iron
     
2.In a separate bowl, beat the eggs. Stir in the milk, butter and vanilla. Pour the milk mixture into the flour mixture;  Next fold in three shakes of cinnamon beat until blended
      
3. At this time you can also melt your 1/2 cup of butter used to pour over waffles. Next generously spray your waffle iron with no stick cooking spray. Than ladle a little batter into a preheated waffle iron, gently place on 4-5 apple slices ( depending on size of your waffle iron, smaller size use 2-3 apples.

4. Next add more batter on top of apples, be careful not to overflow waffle maker. Cook the waffles until golden and crisp. ( Caution, mixing the apples directly into the batter yielded undesirable results for me)

5.Once fully cooked immediately pour melted butter on each side of the waffle and than dip each buttered side into your cinnamon/sugar churro mixture.

Sunday, January 11, 2015

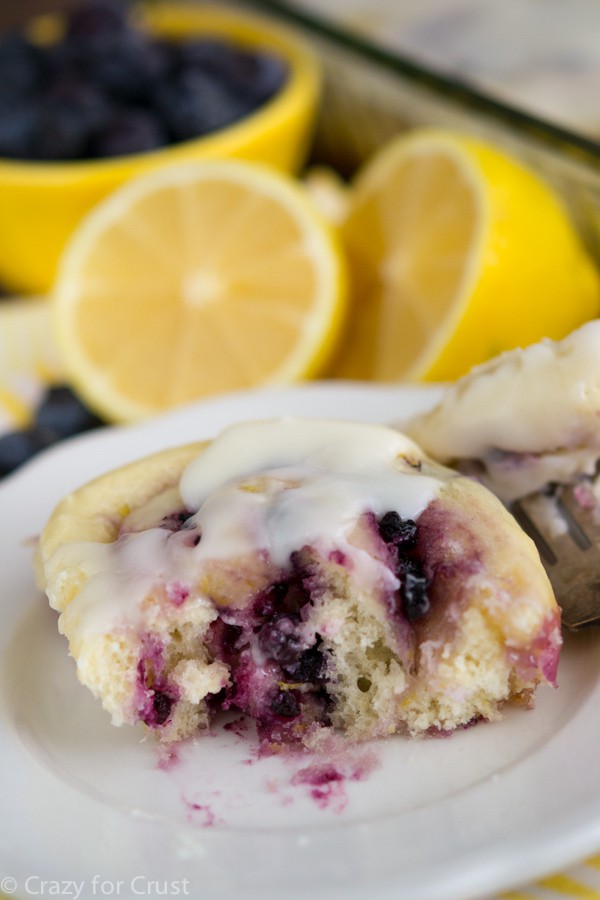
Lemon Blueberry Sweet Rolls

Lemon Blueberry Sweet Rolls 
Lemon Blueberry Sweet Rolls from Crazy for Crust

*I used the sweet roll recipe from America's Test Kitchen found here.  I reduced the amount of milk to 2/3 c  and added zest and lemon juice just like in the original recipe. Next time I would double the amount of filling (not blueberries) to get a little more lemon flavor coming through.  I used her cream cheese  frosting recipe and really liked it.  I used regular blueberries and they were big as far as blueberries go. When I sliced the dough into individual rolls some of the blueberries were cut and looked a little like olives. I just turned over any blueberries that had been sliced so they still looked like berries.  I made them the night before I needed them and baked them the following morning after letting them sit out and rise.  Turned out great!

Lemon Blueberry Sweet Rolls (taken directly from the website)


Prep Time: 45 minutes
Cook Time: 25 minutes
Total Time: 3 hours 20 minutes plus overnight rising
I used my favorite cinnamon roll recipe and turned it into a lemon sweet roll with blueberries! This is the perfect recipe to use up your lemon stash and it'll make the cold morning feel like spring!

Ingredients:

For the Dough:

  • 2/3 cup warm non-fat milk (think hot bath water, about 45 seconds in the microwave)
  • 1 package active dry yeast (about 2 1/4 teaspoons)
  • 1/3 cup + 1/2 teaspoon sugar, divided
  • 3 tablespoons unsalted butter, softened
  • 1/2 teaspoon salt
  • 1 egg
  • 1 teaspoon lemon zest (from 1 medium lemon)
  • 2 tablespoons fresh lemon juice (from 1 medium lemon)
  • 3 - 3 1/4 cups all-purpose flour, plus more for dusting
  • Paddle attachment & dough hook for your mixer

For the Filling:

  • 4 tablespoons unsalted butter, softened
  • 1/2 cup granulated sugar
  • 2 teaspoons lemon zest (from 1-2 medium lemons)
  • 2 tablespoons all-purpose flour
  • 1/4 teaspoon salt
  • 1-2 cups blueberries, fresh or frozen (if frozen, make sure they are thawed and drained), see note

For the Frosting:

  • 2 tablespoons butter, melted
  • 2 ounces cream cheese, very soft
  • 1 1/2 cups powdered sugar
  • Pinch salt
  • 3-4 teaspoon fresh lemon juice

Directions:

Make the Dough:

  1. Place milk in a microwave safe measuring cup. Heat for 45 seconds in the microwave, until it’s about 120°F, think hot bathwater. (The time you heat it will need to be adjusted depending on your microwave. You can use a candy or a meat thermometer to test the temperature.) Add yeast and 1/2 teaspoon sugar and stir. Let it sit for a few minutes until frothy.
  2. Place sugar, butter, salt, lemon juice, lemon zest, and egg in the bowl of a stand mixer fitted with the paddle attachment. Mix until the butter is distributed throughout the liquids, although it may be chunky. Pour in the milk/yeast mixture and stir for a few seconds.
  3. Add 3 cups flour and stir with the paddle attachment just until the mixture starts to stick to the paddle. Then replace the paddle with the dough hook. Continue mixing on low speed until the dough forms a ball in the center of the bowl. The dough will be slightly sticky and elastic. There will be minimal transfer to your finger if you poke it. If it’s still very wet, add up to 1/4 cup more flour, 1 tablespoon at a time.
  4. Spray a large bowl with cooking spray and place the dough in it. Spray the top of the dough ball with cooking spray (lightly) and cover the bowl with plastic wrap. Let sit for 2-4 hours until it doubles in size. Note on rising: if your house is warm, it should rise no problem. If it’s cold in your house, it may take longer for the dough to rise.

Prepare your Rolls:

  1. Stir together butter, sugar, lemon zest, salt and flour until it forms a paste.
  2. Once the dough is risen, roll it out on a lightly floured surface into a large rectangle, about 10” by 14”. Spread the filling as evenly as possible over the rectangle, making sure to reach to the sides so the outer rolls have enough filling. Sprinkle with blueberries. I used 1 cup of mini (or “wild”) blueberries that were defrosted and drained. If you’re using regular sized berries, you might want to use more of them.
  3. Roll the dough up tightly from the long end. Slice it into 12 equal rounds. Place the rolls into a 9x13” pan that has been sprayed with cooking spray.
  4. Cover the rolls with plastic wrap and refrigerate overnight. (Or, if you want to make them  the same day, cover with plastic wrap and let them sit for 1 hour until they’ve puffed up a little, then continue as directed below.)
  5. When ready to bake, preheat oven to 350°F. Remove the rolls from the refrigerator and let them warm up to room temperature while the oven is preheating. Remove the plastic wrap and bake for 23-28 minutes, or until they are golden brown. (Mine took 24, be careful not to over bake. The bottoms will turn golden before the tops do.) Note: the blueberries will drain to the bottom of the pan overnight. That’s not a problem.

Make the frosting:

  1. Whisk the melted butter and softened cream cheese until mostly smooth. If your cream cheese is too stiff, you can use a hand mixer. Whisk/beat in powdered sugar and 3 teaspoons lemon juice, adding more as desired for thickness. Pour over warm rolls and serve.

Notes:

Note about blueberries: I prefer to use mini blueberries in my baking, as it's what my family prefers. They are often labeled "wild" and they are smaller than normal berries. You can often find them at Trader Joe's or Whole Foods. You can use regular sized berries, fresh or frozen, but make sure frozen berries are thawed and drained. Use 1-2 cups, deepening on how many berries you want in your rolls.